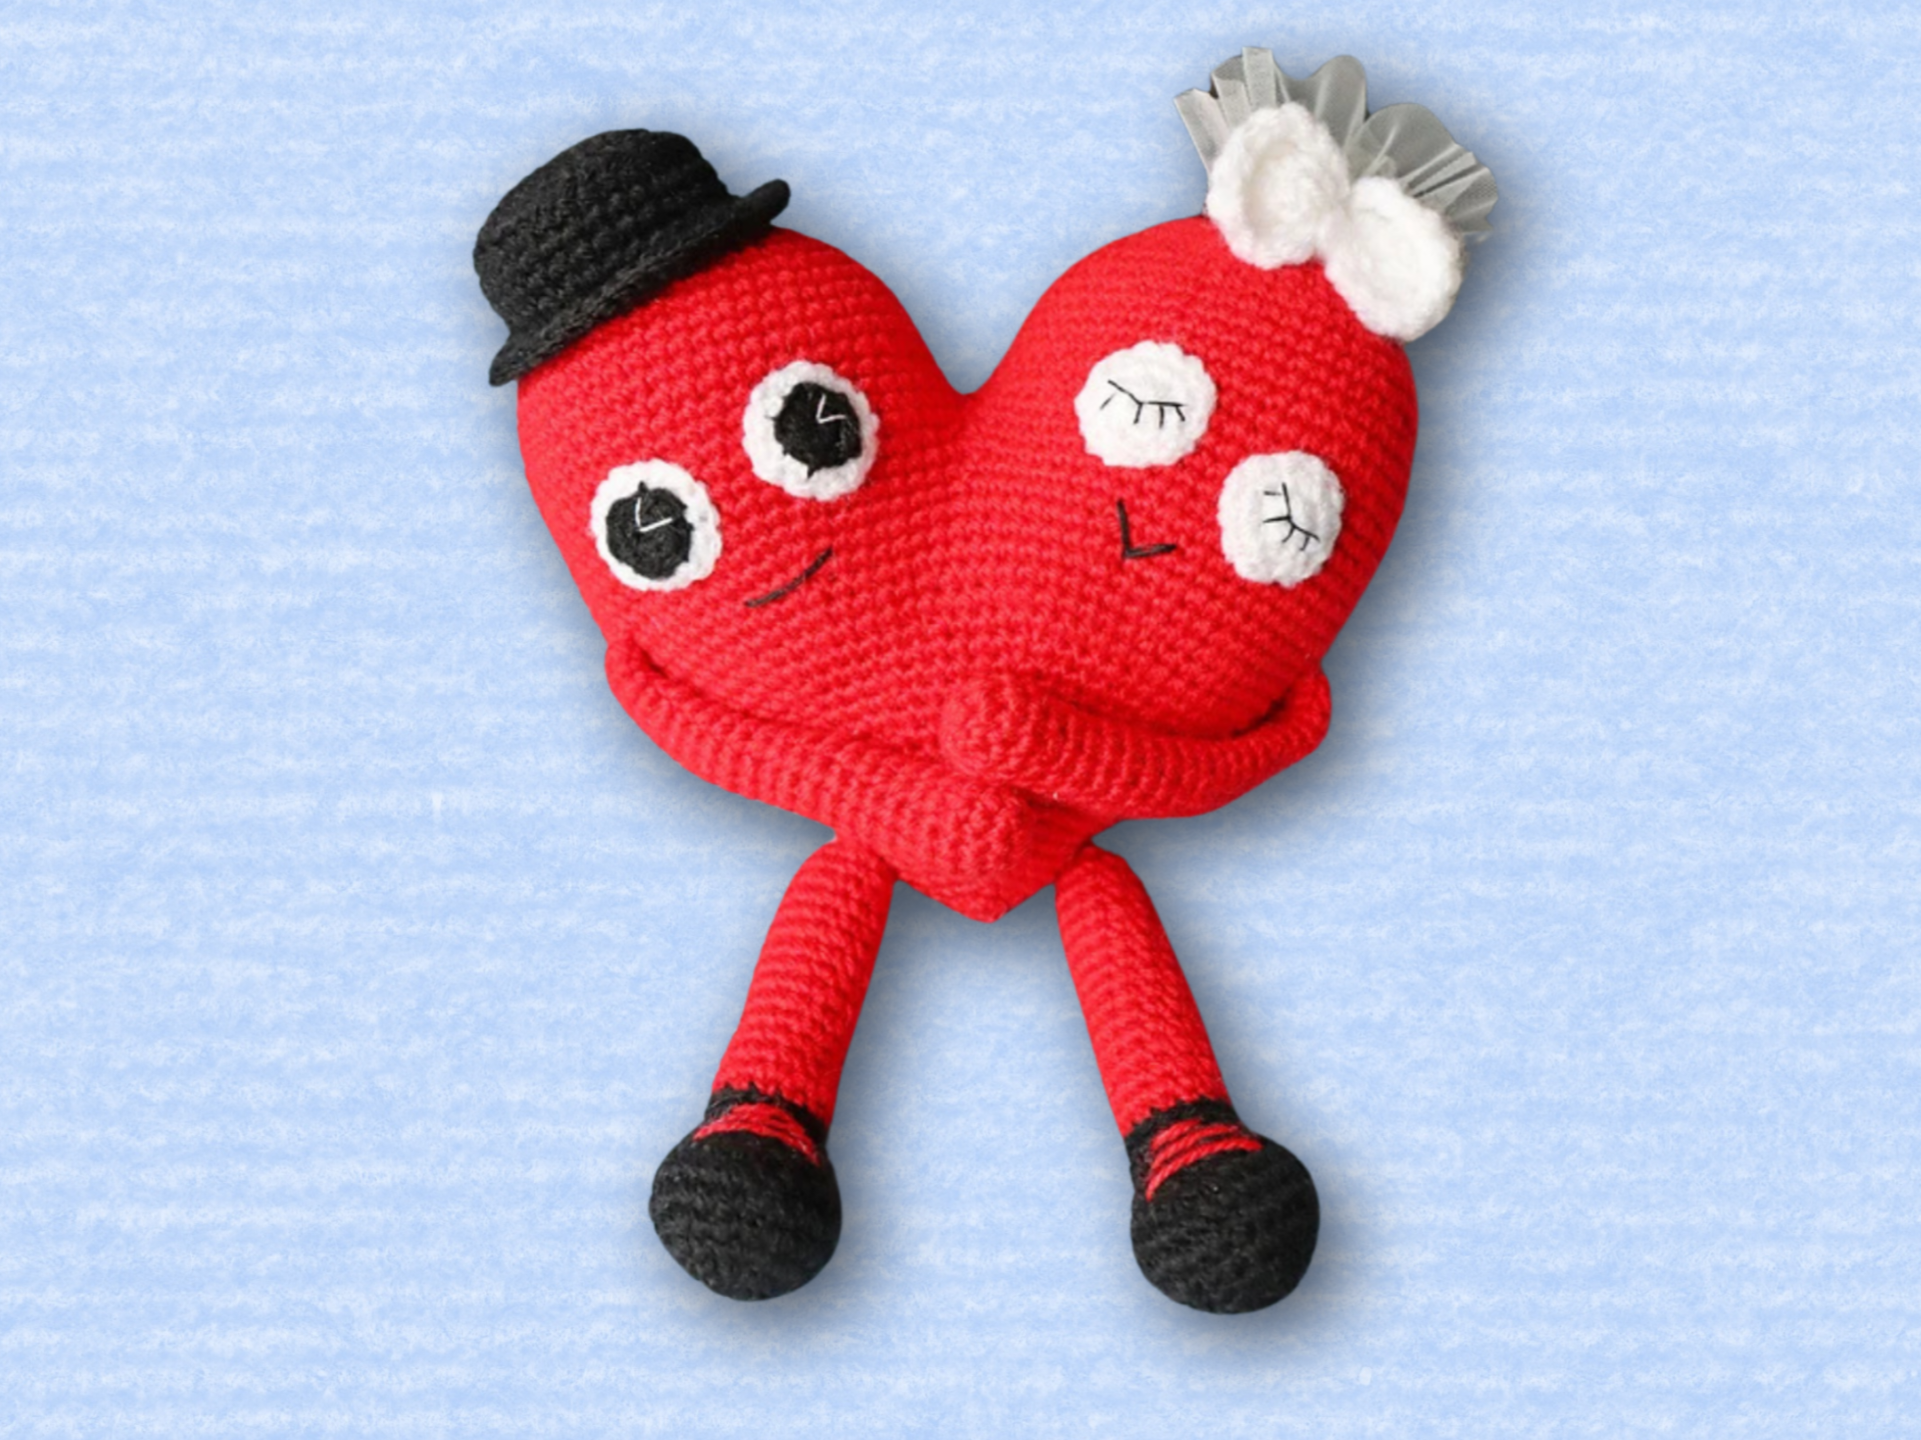
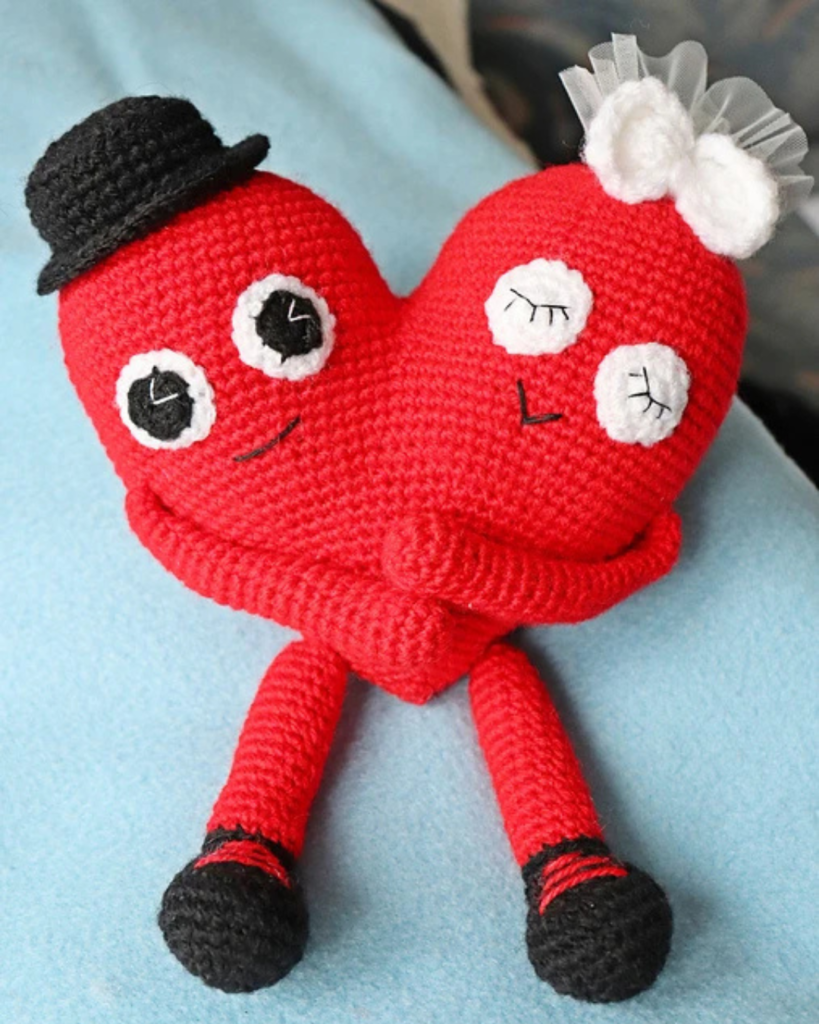
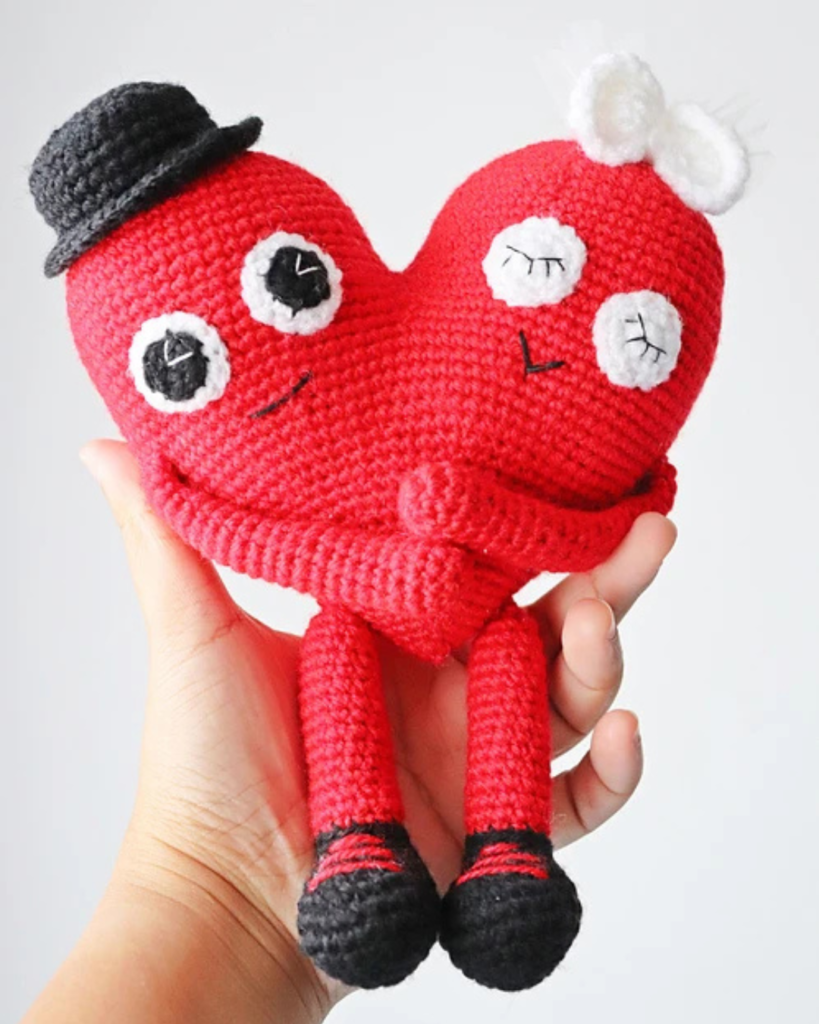
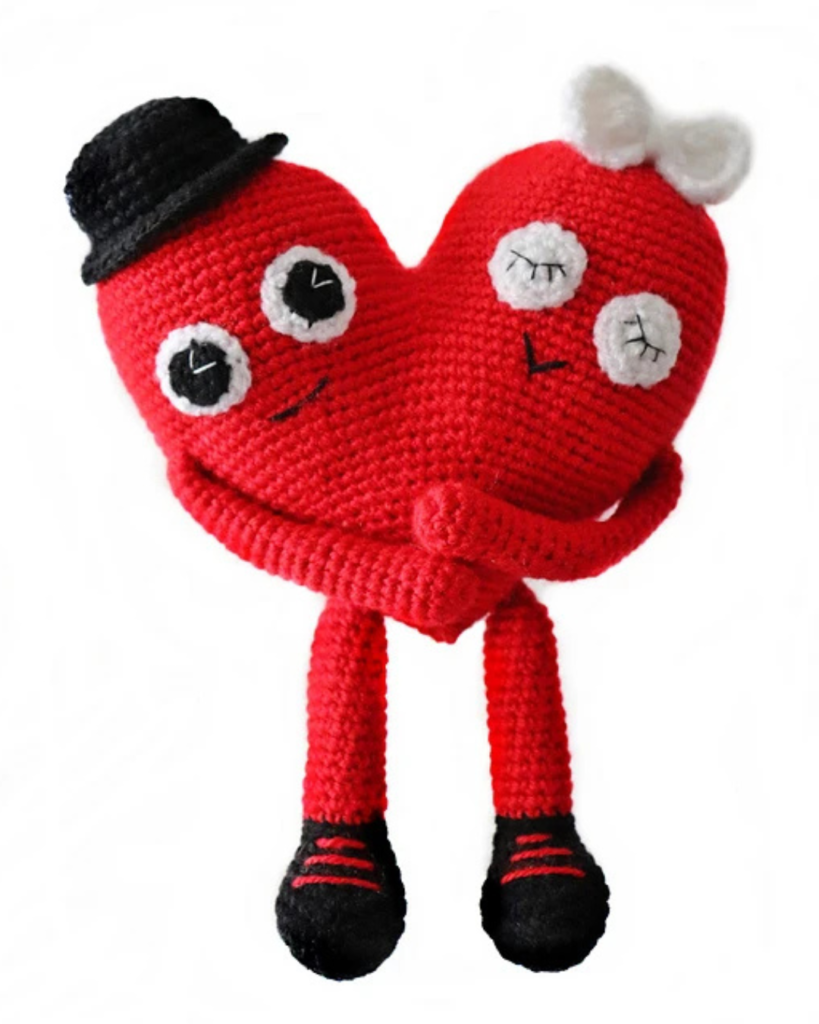
A sweet handmade gift for couples, weddings, or Valentine’s Day
There’s something special about crocheting a gift that represents love.
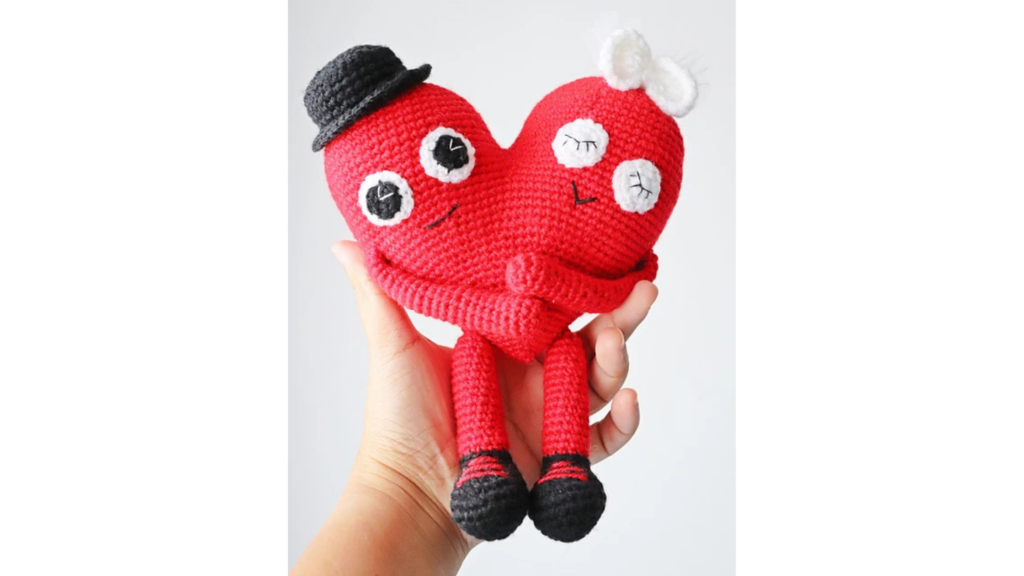
In this pattern, we’re going to make a Heart Couple — a charming amigurumi where one big heart represents the unity of two lovers: the Groom and the Bride. Their connected heads symbolize two people becoming one, making this project a meaningful handmade keepsake.
This adorable crochet piece makes a wonderful gift for:
• Newlyweds
• Engagement celebrations
• Anniversaries
• Valentine’s Day
• Handmade wedding decor
The pattern is designed for beginners who already know basic crochet stitches, and the project works up quickly with simple shaping and easy assembly.
So grab your yarn and hooks, take a deep breath, and enjoy the creative process.
Happy crocheting — let’s get started!
Materials & Tools
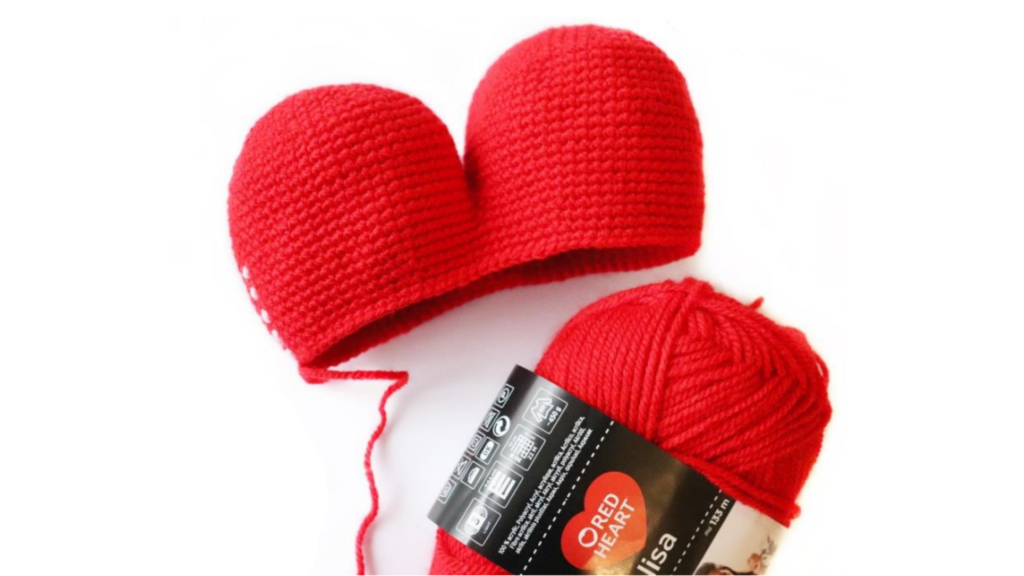
• 3-ply acrylic yarn – Red (Red Heart Lisa, Shade: Fire)
• 3-ply acrylic yarn – White (Red Heart Lisa)
• 3-ply acrylic yarn – Black
• 2.5 mm crochet hook
• 3.0 mm crochet hook
• Poly-fiber filling (toy stuffing)
• Yarn needle
• Sewing needle
• Scissors
• White sewing thread
• Black sewing thread
• 8 × 30 cm lace (for bridal veil/train)
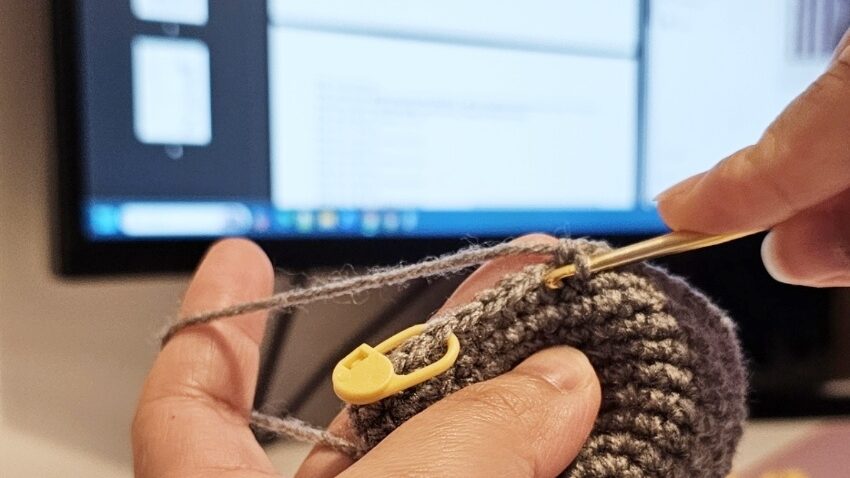
• Stitch marker
• Stick for pushing stuffing inside
Abbreviations (US Terms)
• CH – chain
• SC – single crochet
• INC – increase (2 sc in one stitch)
• DEC – decrease
• FLO – front loop only
• BLO – back loop only
• *…* – repeat instructions
Special Stitch
Quinate Stitch
Make five yarn-over / pull-through motions in the same stitch to create a decorative textured stitch.
A video tutorial you can follow to make this special stitch.
Pattern Information
Skill Level: Beginner
(Requires basic crochet stitches, sewing, and to learn new or special stitch introduced)
Approximate size
• Height: 21 cm
• Width: 17 cm
Gauge
• No strict gauge required
• Work tight stitches to prevent stuffing from showing
Stuffing
• Approximately 60 grams of poly-fiber filling
Estimated Time
• About 45 minutes (without interruptions)
Pattern Notes
- This pattern is beginner-friendly but requires knowledge of basic crochet stitches.
- The pattern is worked in continuous rounds, unless otherwise noted.
- Use a stitch marker to track the end of each round.
- Always check the stitch count in parentheses.
- Stuff gradually and evenly to avoid lumps.
- Take breaks when needed — stretch your hands, drink water, and enjoy the process.
Written Pattern
Head (Make 2)
Use 3-ply red yarn and 2.5 mm crochet hook.
First Head
Round 1: Magic ring, 8 sc (8)
or CH 2, 8 sc in second chain from hook (8)
Round 2: Inc all around (16)
Round 3: *1 sc, inc* × 8 (24)
Round 4: *3 sc, inc* × 6 (30)
Round 5: *2 sc, inc, 2 sc* × 6 (36)
Round 6: Sc all around (36)
Round 7: *5 sc, inc* × 6 (42)
Round 8: *3 sc, inc, 3 sc* × 6 (48)
Round 9: *7 sc, inc* × 6 (54)
Rounds 10–18: Sc all around (54)
Fasten off after finishing and leave yarn tail for sewing.
Place a stitch marker on the 27th stitch of the last round.
This mark will be where the two heads connect later.
Second Head (Continues to Body)
Repeat R1–R18 to create the second head.
Do not cut the yarn, as this piece will continue into the body.
To connect the two heads:
• Cut a 10 cm piece of red yarn
• Place it through the 27th stitch of the second head
• Pull it through the marked stitch on the first head
• Tie the ends securely to connect them
Continue crocheting from the last stitch to begin the body section.
Round 11: 26 sc, 53 sc, 27 sc (106)
Round 12: 25 sc, dec, 51 sc, dec, 26 sc (104)
Round 13: 23 sc, dec, 1 sc, dec, 47 sc, dec, 1 sc, dec, 24 sc (100)
Round 14: Sc all around (100)
Round 15: 24 sc, dec, 48 sc, dec, 24 sc (98)
Round 16: 23 sc, dec, 47 sc, dec, 24 sc (96)
Round 17: 30 sc, dec × 3 (93)
Round 18: 14 sc, dec, 15 sc × 3 (90)
Round 19: 13 sc, dec × 6 (84)
Round 20: 19 sc, dec × 4 (80)
Shaping up
Start filling the body gradually with poly-fiber stuffing.
Round 21: 9 sc, dec, 9 sc × 4 (76)
Round 22: 17 sc, dec × 4 (72)
Round 23: 10 sc, dec × 6 (66)
Round 24: 9 sc, dec × 6 (60)
Round 25: 13 sc, dec × 4 (56)
Round 26: 6 sc, dec, 6 sc × 4 (52)
Round 27: 11 sc, dec × 4 (48)
Round 28: 5 sc, dec, 5 sc × 4 (44)
Round 29: 9 sc, dec × 4 (40)
Round 30: 4 sc, dec, 4 sc × 4 (36)
Fill gradually and firmly with Poly-fiber filling or any preferred toy stuffing until the end. Make sure to distribute it evenly to avoid deformation. Use small amount of filling at a time to avoid big clumps/lumpy figure. Distribute evenly on gaps in between by using/poking a stick.
Round 31: 10 sc, dec × 3 (33)
Round 32: 4 sc, dec, 5 sc × 3 (30)
Round 33: 8 sc, dec × 3 (27)
Round 34: 7 sc, dec × 3 (24)
Round 35: 4 sc, dec × 4 (20)
Round 36: 3 sc, dec × 4 (16)
Round 37: 2 sc, dec × 4 (12)
Round 38: 1 sc, dec × 4 (8)
Round 39: Slip stitch 4x (4)
Fasten off and cut yarn tail and using yarn needle, Hide the yarn tail inside the body of the amigurumi.
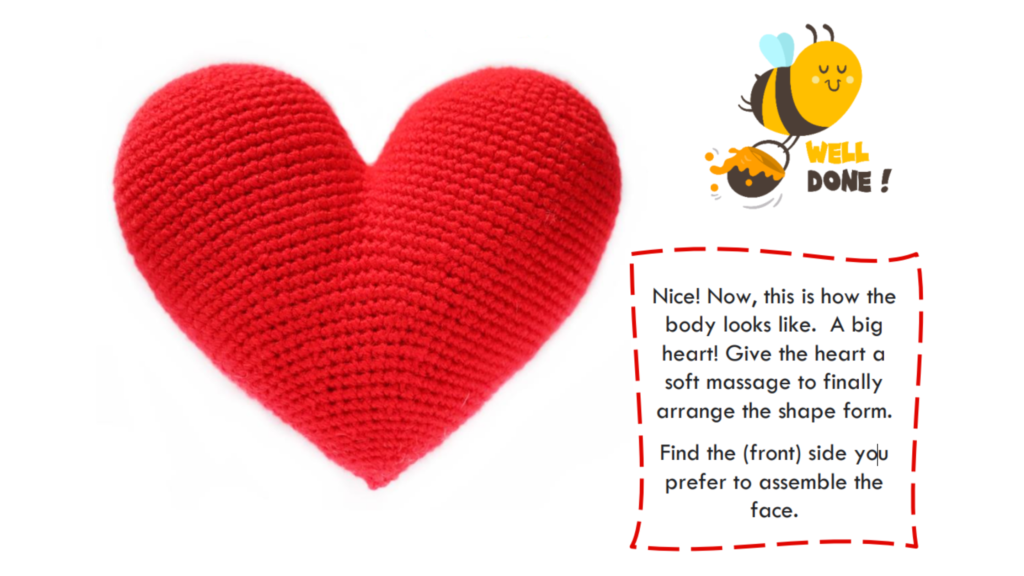
Nice! Now, this is how the body looks like. A big heart! Give the heart a soft massage to finally arrange the shape form. Find the (front) side you prefer to assemble the face.
Arms
Use 3-ply red yarn and 2.5 mm crochet hook. Make 2 pieces.
Round 1: Magic ring, 6 sc (6)
Round 2: Inc all around (12)
Rounds 3 – 4: Sc all around (12)
Round 5: 2 sc, dec × 3 (9)
Rounds 6 – 23: Sc all around (9)
Lightly stuff the hands and arms. Leave about 40 cm yarn tail for sewing.
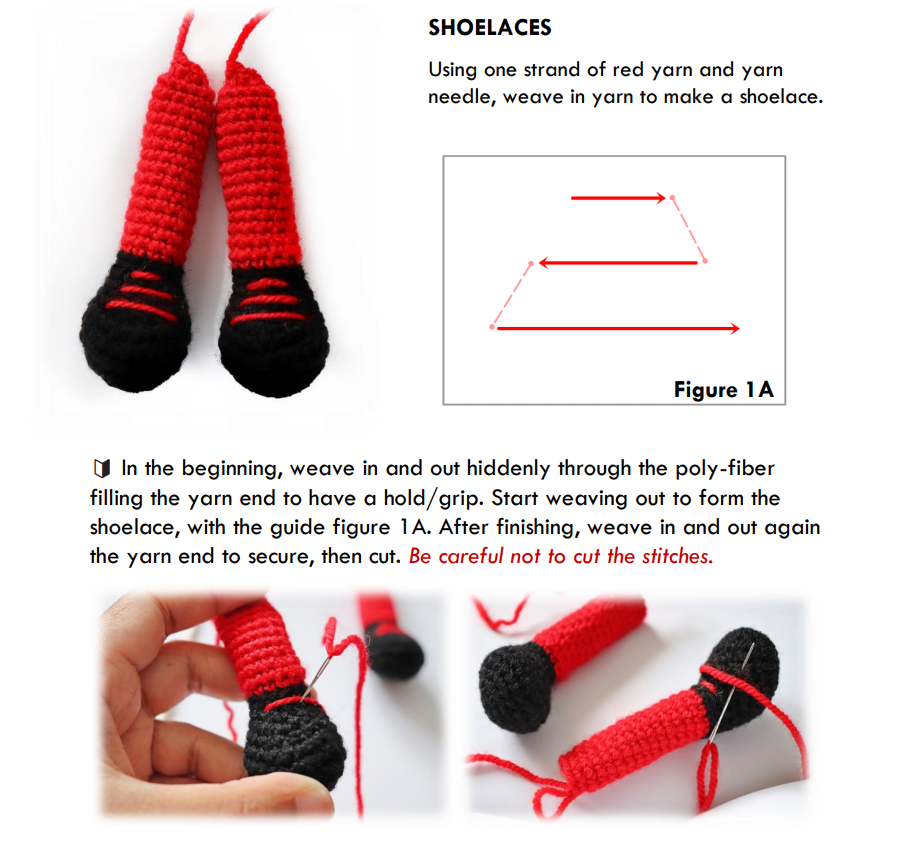
Shoes and Legs
Use black yarn and 2.5 mm hook. Make 2 pieces
Round 1: Magic ring, 8 sc (8)
Round 2: 1 sc, inc × 4 (12)
Round 3: 1 sc, inc × 6 (18)
Round 4: 1 sc, inc, 1 sc × 6 (24)
Rounds 5 – 6: Sc all around (24)
Round 7: 10 sc, dec, dec, 10 sc (22)
Round 8: 8 sc, dec, dec, dec, 8 sc (19)
Round 9: 5 sc, dec, dec, 1 sc, dec, dec, 5 sc (15)
Round 10: 5 sc, dec, skip 1 st, dec, 5 sc (12)
Round 11: Sc all around (12)
Change to red yarn.
Rounds 12 – 26: Sc all around (12)
Round 27: Dec × 6 (6)
Fasten off leaving yarn tail for sewing.
Stuff evenly. Use small only amount of filling at a time to avoid big clumps/lumpy figure. Use a stick to poke the stuffing.
Groom Details
Eyes
Eyes (Lining)
Use white yarn.
R1: Magic ring, 8 sc (8)
R2: Inc all stitches (16)
Eyes (Inside)
Use black yarn.
R1: Magic ring, 8 sc (8)
Sew together using black sewing thread.
Add a V-shaped detail using white sewing thread.
Hat
Use black yarn and 2.5 mm hook.
Round 1: Magic ring, 8 sc (8)
Round 2: Inc all around (16)
Round 3: 1 sc, inc × 8 (24)
Round 4: 2 sc, inc × 8 (32)
Round 5: Sc all around (32)
Round 6: BLO sc all around (32)
Rounds 7 – 9: Sc all around (32)
Round 10: FLO 1 sc, inc × 16 (48)
Round 11: Sc all around, slip stitch at the end.
Attach hat to groom’s head and lightly stuff before closing.
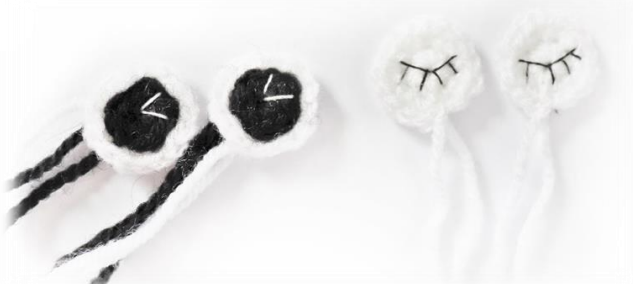
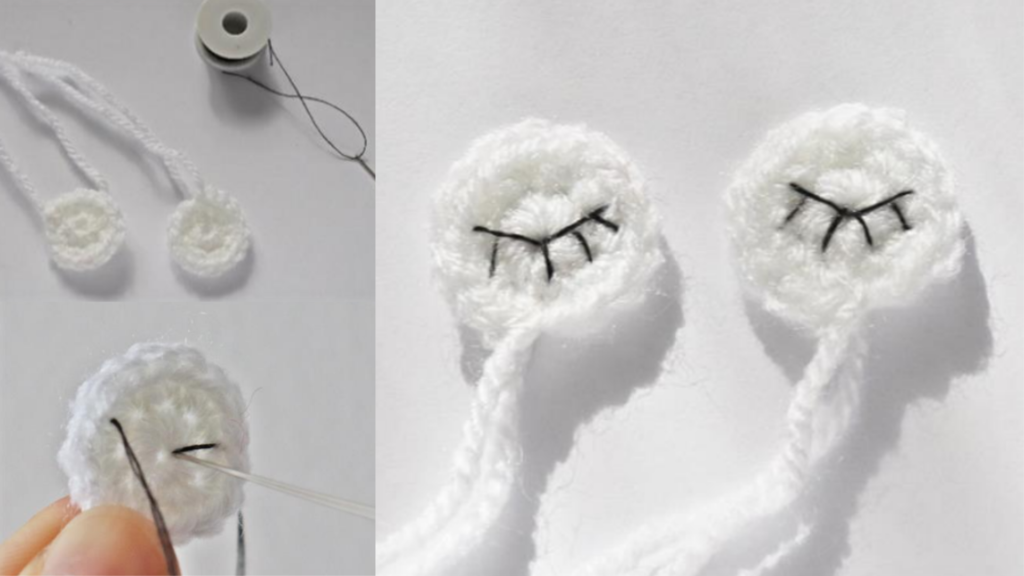
Bride Details
Eyes
Use white yarn.
R1: Magic ring, 8 sc (8)
R2: Inc all stitches (16)
Cut yarn then fasten off and securely hide the yarn tail. No need to leave yarn tail because the eyes will be sewn using white sewing thread.
Eye Details:
Using Black sewing thread and needle, create stitches of eye details as seen in the picture.
Ribbon
Using two strands of white yarn and 3.0 mm hook:
Magic ring, CH 6
5 quinate stitches into ring
CH 6, slip stitch
CH 6, 5 quinate stitches
CH 6, slip stitch
Wrap yarn around center to form the ribbon.
Bridal Veil
Cut 8 × 30 cm lace.
Fold and pleat to form a fan shape.
Sew the middle to attach it to the bride’s head.
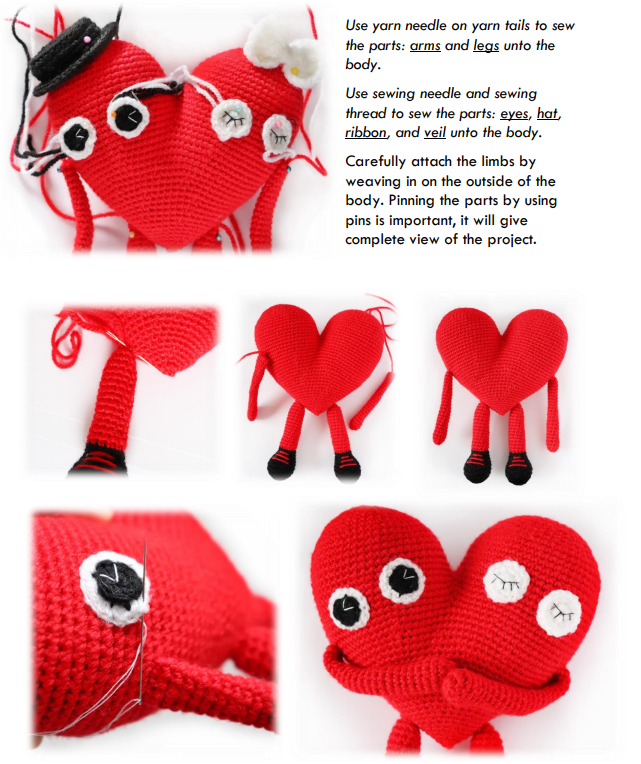
Assembly
Use yarn needle to sew and attach:
• Arms
• Legs
Use sewing needle and thread to attach:
• Eyes
• Hat
• Ribbon
• Veil
Pin pieces first before sewing to ensure correct placement.
Finishing Touch
Embroider lips:
• Arc shape for the groom
• V shape for the bride
Use black thread for the embroidery.

Voila! You did it!
Congratulations for finishing Heart Couple Crochet! I hope you enjoy making one. Great as a gift for newly wed lovers! Happy Crocheting!
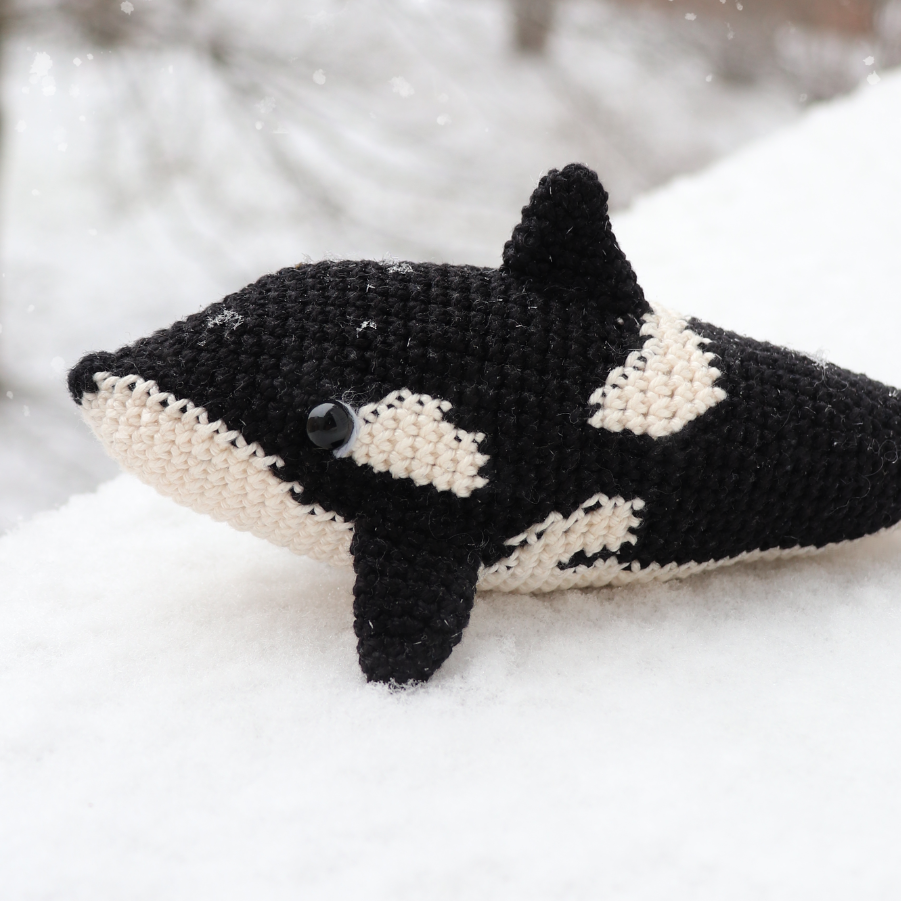
lshie (on Facebook).I am excited to see your version of Naree the Narwhal.
Explore More
If you enjoyed making Heart Couple, you may also like:
• Little Mouse Easy Amigurumi Pattern
• Narwhal Beginner Friendly Crochet Pattern
• Clara the Chicken Easy Crochet Pattern
• Heart Couple Amigurumi Pattern
Be sure to bookmark this page or share it with fellow crocheters who love quick, charming, and enjoyable crochet makes!
Pattern Support
If you need help or want to ask questions about the pattern, please contact us on our Contact page. If you choose to modify the pattern or use a different yarn weight or crochet hook size, you can share your questions to our Facebook WCC Woolshie Crochet Club. I would love to help and other members too!
Beginner Tips for Success
If this is one of your first crochet projects, keep these tips in mind:
- Use tight stitches
Tighter stitches help prevent the stuffing from showing through the fabric. - Mark your rounds
Place a stitch marker at the end of each round so you don’t lose track of your stitches. - Stuff gradually
Add small amounts of stuffing at a time and distribute it evenly to keep the heart shape smooth and firm. - Take breaks when needed
Crocheting should feel relaxing. Stretch your hands, drink water, and return with fresh energy. - Don’t worry about perfection
Handmade pieces have personality. Small variations make your crochet project unique and special.
Crochet is meant to be relaxing, so don’t worry about perfection. Each piece you make helps build confidence and skill.
Accessibility Statement
This pattern is written in clear, beginner-friendly language and is designed to be accessible to crocheters of all skill levels. This guide is carefully structured to ensure that even first-time amigurumi makers can follow along and enjoy the process.
Copyright
This pattern is © Woolshie. Do not copy, reproduce, or share, in partial or full, without permission. You may sell finished items in small quantities. Please credit @woolshie when posting your makes. I would love to see it!
Looking for a Crochet Buddy?
Let’s get connected! I would love to be your crochet buddy, sharing crochet WIPS and finished makes!
Total Beginner to Crochet?
Don’t worry! At Woolshie, crochet tutorials and beginner course are available for free.