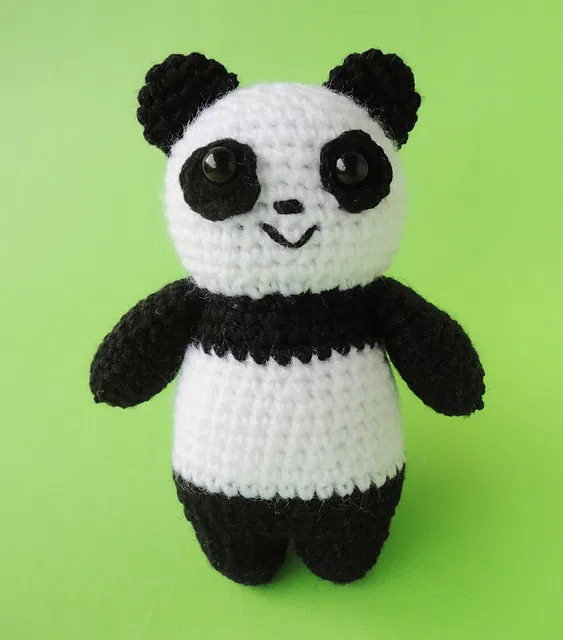
Meet Panda Bear, a sweet and friendly amigurumi designed to bring smiles to little ones and panda lovers alike. With simple shaping and classic colorwork, this project is perfect for beginners who want to grow their amigurumi skills while creating a timeless handmade toy.
Create an adorable panda amigurumi with this beginner-friendly crochet pattern! This cute plushie is worked in continuous rounds from the legs up, making it seamless and perfect for gifting, decorating a nursery, or adding to your amigurumi collection.
PDF Pattern is available on Ravelry.
Pattern Details
- Skill level: Beginner
- Technique: Amigurumi, worked in continuous rounds
- Finished size: ~14cm (~5.5 in) Size may vary depending on yarn tension and hook size.
- Gauge: Tight and even stitches are recommended for amigurumi
- Language: US crochet terms
Materials & Tools
- 4-ply acrylic yarn in White and Black
- 2.5 mm crochet hook
- 6 mm safety eyes
- Fiberfill stuffing
- Yarn needle
- Scissors
- Stitch marker
US Terms Abbreviations
- sc – single crochet
- inc – increase single crochet
- dec – decrease single crochet
- sl st – slip stitch
- FLO – front loop only
Start Crocheting
Arms
Make 2, use black yarn
Round 1: Magic Ring of 6 sc (6)
Round 2: Inc all around (12)
Round 3: [3 sc, inc] x3 (15)
Rounds 4-8: Sc all around (15)
Round 9: [3 sc, dec] x3 (12)
Round 10: Sc all around (12)
Fasten off. Cut a long tail for sewing the parts to the body. Make 2 Hands. Add fiberfill inside, enough for fluffiness.
Ears
Make 2, use black yarn
Round 1: Magic Ring of 6 sc (6)
Round 2: Inc all around (12)
Rounds 3-4: Sc all around (12)
Fasten off and leave a long yarn tail for sewing.
Eye patches
Make 2, use black yarn
Round 1: Magic Ring of 6 sc (6)
Round 2: 6 inc, 2 sl st (6)
Cut a yarn tail long enough to sew the eye patch to the face. Insert the Safety eye in the
main hole of the Magic Ring. Attach the eyes and sew eye patch. Insert the eyes in the
hole between R27 and R28, with 6 sc apart.
Legs
Make 2 legs, use black yarn
Right leg
Round 1: Magic Ring of 6 sc (6)
Round 2: Inc all around (12)
Round 3: Sc all around (12)
Round 4: 12 Sc, 2 sl st (12)
Fasten off. Cut a yarn tail long enough for sewing to the other leg.
Left leg
Round 1: Magic Ring of 6 sc (6)
Round 2: Inc all around (12)
Round 3: Sc all around (12)
Round 4: Sc all around, 2 sl st (12)
Fasten off then cut, hide the ends. Sew to combine the legs’ last sl st together.
Continue to work for the body upward.
Body
Start with a 1 slip knot in the first sl st of the right leg.
Round 5: Sc all around on 2 legs (24)
Round 6: [1 sc, inc] x12 (36)
Rounds 7-8: Sc all around (36)
Change to white yarn
Rounds 9-14: Sc all around (36)
Round 15: [4 sc, dec] x6 (30)
Round 16: Sc all around (30)
Change to black yarn
Round 17: Sc all around (30)
Round 18: [4 sc, dec] x5 (25)
Round 19: Sc all around (25)
Round 20: [3 sc, dec] x5 (20)
Fasten off and cut. Continue to work for the head upward. As you crochet along the pattern, fill the legs and body with Fiberfill enough to build the shape.
Head
Change to white yarn
Round 21: FLO 1 Sl knot where the end of the previous round. FLO inc all around (40)
Round 22: 38 sc, 1 dec (39)
Round 23: 37 sc, 1 dec (38)
Rounds 24-27: Sc all around (38)
Round 28: 36 sc, 1 dec (37)
Note: Attach eyes and sew eye patch. Insert the eyes in the hole between R27 and R28, with 6 sc apart.
Round 29: 35 sc, dec (36)
Round 30: [4 sc, dec] x6 (30)
Round 31: [3 sc, dec] x6 (24)
Round 32: [2 sc, dec] x6 (18)
Round 33: [1 sc, dec] x6 (12)
Round 34: 6 dec (6)
Fill the head with Fiberfill enough to stand its shape. Fasten off and weave ends inside to hide.
Assembling the Parts
1. Attach the 2 ears on the upper 2 sides of the head. Sew the ends. Fasten off, then weave to hide the yarn tail.
2. Sew the arms on R19 and R20 on the 2 sides of the body. Fasten off, make sure to hide the yarn tail.
3. Using black yarn, embroider the nose 2 times in between R5 and R6, between the two eyes.
4 Continue to embroider the mouth in V-shape as seen in the illustration. Fasten off, hide the yarn tail to hide and cut.
Let’s Stay Connected!
I would absolutely love to see your version of this Panda Bear!
Handmade projects are even more special when they’re shared.
You can tag or mention me using
#Woolshie or #CrochetCollections
📍 Follow along and connect with me here:
Explore More Free Crochet Patterns
If you enjoyed making this pattern, you may also love these patterns:
• Little Mouse Easy Amigurumi Pattern
• Narwhal Beginner Friendly Crochet Pattern
• Clara the Chicken Easy Crochet Pattern
• Heart Couple Amigurumi Pattern
These beginner-friendly designs are perfect for gifts for her/him/kids.
Looking for a Crochet Buddy?
Let’s get connected! I would love to be your crochet buddy, sharing crochet WIPS and finished makes!
Total Beginner to Crochet?
Don’t worry! At Woolshie, crochet tutorials and beginner course are available for free.