Baymax Crochet Pattern
Welcome to Woolshie! This is the new home of Crochet Collections.
MAMA BAYMAX
This crochet pattern is inpired by Baymax, from the movie: BIG HERO 6.
“Hello! I am Baymax, your personal healthcare companion.”
This is it! The day has come! My heart is so full with all the good vibes my friends sending me about having a Baymax plushie! I made a Baymax family, including Mama Baymax and Baby Baymaxes. And I want to share to you how did I crocheted them.
Mama Baymax’s pattern is done. So, this is it! I hope you will love crocheting Mama Baymax. 💕
Here are the things to prepare: (These are the materials I used to complete this project. If you may do so, you can use other materials as alternative or tools and materials that are suitable in your “amigurumi making”)

- White 4-ply Acrylic Yarn
- Black embroidery floss (for the black line in the eyes)
- Steel Hook US Size 1 (2.75mm)
- 2 Amigurumi eyes (safety eyes)
- Poly-fiber filling
- Stitch marker
- Scissors
- Tapestry needle
Note:
- Each part of Baymax is worked in continuous rounds. Use a stitch marker for every ends.
- You will notice in this pattern that there are parenthesized numbers, these are the number of stitches you will have in each rows. Please count your rounds according to the number so you will be guided. Thank you! 😆
- The asterisks “*…….*” means a certain stitches will be repeated.
- The purpose of leaving a long tail of yarn is for sewing the ends to combine the parts.
Mama Baymax’s Body

Row 1: Form a magic ring with 6 single crochet in the ring (6)
Row 2: *Single crochet increase* repeat 6 times (12)
Row 3: *1 single crochet, increase* repeat 6 times (18)
Row 4: *2 single crochet, increase* repeat 6 times (24)
Row 5: *3 single crochet, increase* repeat 6 times (30)
Row 6: Single crochet all around the row (30)
Row 7: *9 single crochet, increase* repeat 3 times (33)
Row 8: Single crochet all around the row (33)
Row 9: *10 single crochet, increase* repeat 3 times (36)
Row 10: Single crochet all around the row (36)
Row 11: *11 single crochet, increase* repeat 3 times (39)
Row 12: Single crochet all around the row (39)
Row 13: *12 single crochet, increase* repeat 3 times (42)
Row 14: Single crochet all around the row (42)
Row 15: Single crochet all around the row (42)
Row 16: *13 single crochet, increase* repeat 3 times (45)
Row 17: Single crochet all around the row (45)
Row 18: *14 single crochet, increase* repeat 3 times (48)
Row 19: Single crochet all around the row (48)
Row 20: *5 single crochet, increase* repeat 8 times (56)
Row 21-26: Single crochet all around the row (56)
Row 27: *6 single crochet, decrease* repeat 7 times (49)
Row 28: *5 single crochet, decrease* repeat 7 times (42)
Row 29: *5 single crochet, decrease* repeat 6 times (36)
Fill the body with loads of poly-fiber filling.
Row 30: *4 single crochet, decrease* repeat 6 times (30)
Row 31: *3 single crochet, decrease* repeat 6 times (24)
Row 32: *2 single crochet, decrease* repeat 6 times (18)
Row 33: *1 single crochet, decrease* repeat 6 times (12)
Row 34: *Single crochet decrease* repeat 6 times (6)
Leave a tail of yarn just enough to hide the end.

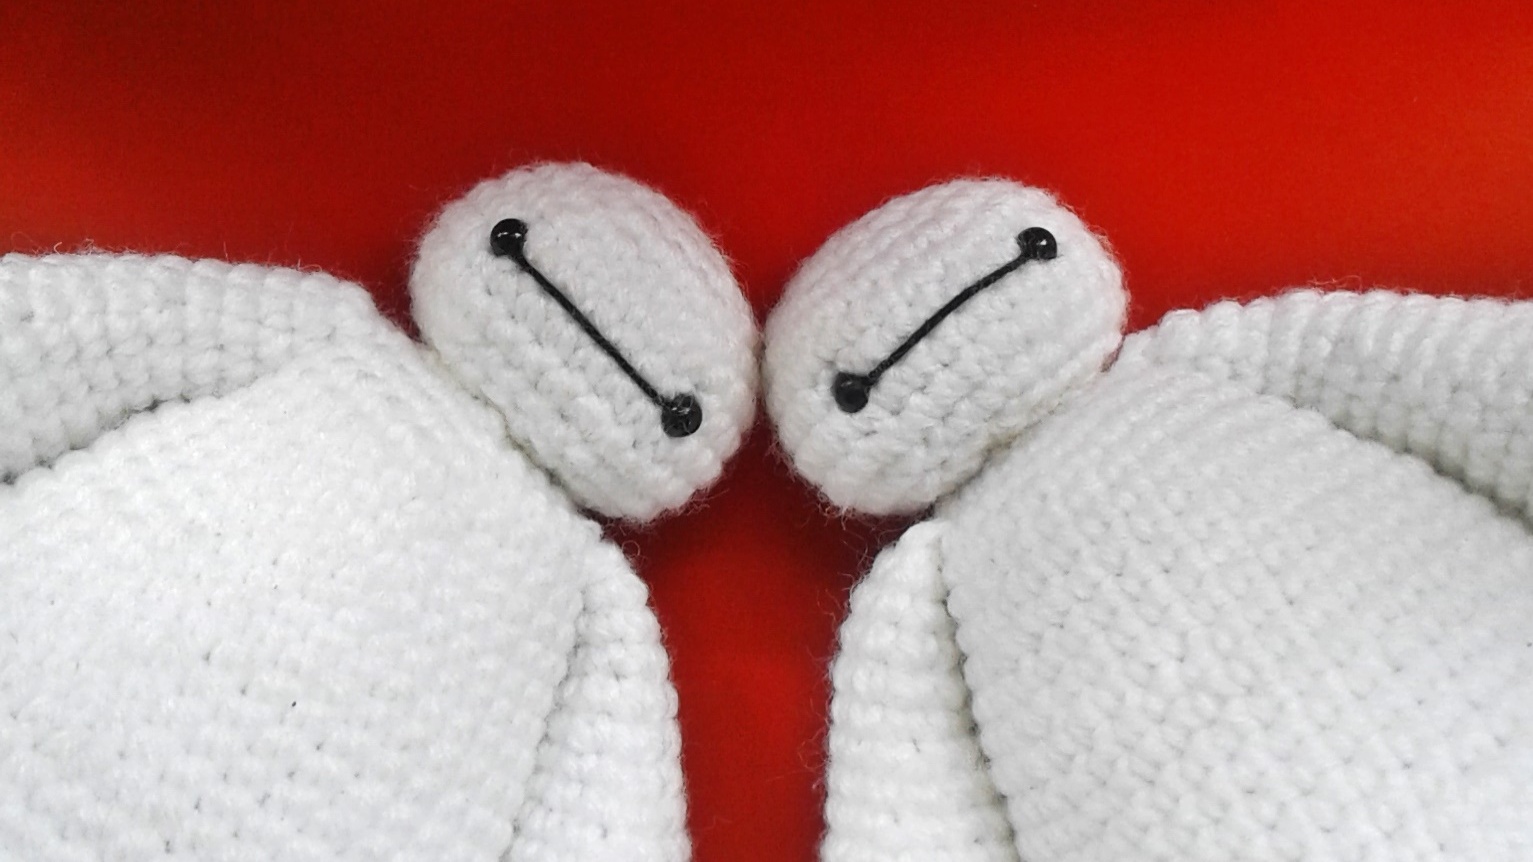
Mama Baymax’s Head

Row 1: Form a magic ring with 6 single crochet in the ring (6)
Row 2: *Single crochet increase* repeat 6 times (12)
Row 3: *1 single crochet, increase* repeat 6 times (18)
Row 4: *2 single crochet, increase* repeat 6 times (24)
Row 5: *3 single crochet, increase* repeat 6 times (30)
Row 6-9: Single crochet all around the row (30)
Row 10: *3 single crochet, decrease* repeat 6 times (24)
Make a black line by using the black thread. Place the 2 ami eyes both ends of the black line. Fill the head with loads of poly-fiber filling.
Row 11: *2 single crochet, decrease* repeat 6 times (18)
Row 12: *1 single crochet, decrease* repeat 6 times (12)
Row 13: *Single crochet decrease* repeat 6 times (6)
Row 14: *Single crochet decrease* repeat 6 times (3)
Leave a long tail of yarn for sewing.
Mama Baymax’s Hands (Make 2)
Row 1: Form a magic ring with 6 single crochet in the ring (6)
Row 2: *Single crochet increase* repeat 6 times (12)
Row 3: *1 single crochet, increase* repeat 6 times (18)
Row 4: *5 single crochet, increase* repeat 3 times (21)
Row 5-8: Single crochet all around the row (21)
Row 9: 9 single crochet, decrease, 10 single crochet (20)
Row 10: Single crochet decrease, 18 single crochet (19)
Row 11: 9 single crochet, decrease, 8 single crochet (18)
Row 12: Single crochet decrease, 16 single crochet (17)
Row 13: 7 single crochet, decrease, 8 single crochet (16)
Row 14: Single crochet decrease, 14 single crochet (15)
Row 15: 7 single crochet, decrease, 6 single crochet (14)
Do not forget to fill the hands with enough poly-fiber filling.
Row 16: Single crochet decrease, 12 single crochet (13)
Row 17: 5 single crochet, decrease, 6 single crochet (12)
Row 18-19: Single crochet all around the row (12)
Row 20: Single crochet decrease, 10 single crochet (11)
Row 21-22: Single crochet all around the row (11)
Leave a long tail of yarn for sewing.
Mama Baymax’s Feet (Make 2)
Row 1: Form a magic ring with 6 single crochet in the ring (6)
Row 2: *Single crochet increase* repeat 6 times (12)
Row 3: *1 single crochet, increase* repeat 6 times (18)
Row 4: Single crochet all around the row (18)
Row 5: *5 single crochet increase* repeat 3 times (21)
Leave a long tail for sewing.

When all the parts are ready to combine, use the tapestry needle to sew the parts. As shown in the picture, sew the head on top, hands on the sides of the body, and feet below. When sewing the feet, make sure to fill each feet with poly-fiber filling before closing.

Want an ad-free PDF of this pattern? It is already available on my Ravelry! For FREE!
Thank you for coming! I hope you enjoyed crocheting.
with love, Angie